März
11
März
24
wievielkredit.de
10 kostenlose Kreditrechner, die du vor jeder Finanzierung kennen solltest
Wer einen Kredit aufnehmen will, steht vor vielen Fragen: Wie viel kann ich mir leisten? Was kostet mich das am Ende? Lohnt sich eine Umschuldung? Die meisten Menschen unterschreiben einen Kreditvertrag, ohne diese Fragen wirklich durchgerechnet zu haben.
Auf WievielKredit.de gibt es eine Sammlung kostenloser Rechner, die genau dabei helfen. Kein Login, keine Werbung, keine Datenübertragung — alle Berechnungen laufen direkt im Browser. Hier ein Überblick.
1. Kreditrahmen-Rechner: Wie viel Kredit kann ich mir leisten?
Die wichtigste Frage kommt zuerst. Der Kreditrahmen-Rechner berechnet anhand von Einkommen, Ausgaben und gewünschter Laufzeit, welchen Kreditbetrag du dir realistisch leisten kannst. Grundlage ist die bewährte Faustregel, dass die monatliche Rate maximal 35 % des Nettoeinkommens betragen sollte.
Wann sinnvoll: Vor dem ersten Bankgespräch, um eine realistische Vorstellung vom möglichen Kreditrahmen zu bekommen.
2. Monatsrate berechnen
Du weißt, wie viel du leihen willst — aber was bedeutet das monatlich? Der Monatsrate-Rechner zeigt dir die monatliche Belastung bei verschiedenen Zinssätzen und Laufzeiten.
Wann sinnvoll: Wenn du ein konkretes Angebot vergleichen oder verschiedene Szenarien durchspielen willst.
3. Laufzeit-Rechner
Umgekehrt gedacht: Du weißt, wie viel du monatlich zahlen kannst, aber nicht wie lange. Der Laufzeit-Rechner berechnet, wie viele Monate oder Jahre du für die Tilgung brauchst.
Wann sinnvoll: Wenn du eine feste monatliche Rate im Kopf hast und wissen willst, ob der Kredit in einem vernünftigen Zeitraum abbezahlt ist.
4. Zinskosten-Rechner
Die Monatsrate klingt machbar — aber was kosten dich die Zinsen insgesamt? Der Zinskosten-Rechner zeigt die Gesamtkosten des Kredits auf einen Blick.
Wann sinnvoll: Um verschiedene Angebote nicht nur nach Monatsrate, sondern nach Gesamtkosten zu vergleichen. Ein Kredit mit niedrigerer Rate kann am Ende deutlich teurer sein.
5. Tilgungsplan erstellen
Wer es genau wissen will, lässt sich einen Tilgungsplan erstellen. Monat für Monat aufgeschlüsselt: Wie viel geht in die Tilgung, wie viel in die Zinsen? Wie entwickelt sich die Restschuld?
Wann sinnvoll: Für die detaillierte Finanzplanung und um zu verstehen, wie sich Sondertilgungen auswirken würden.
6. Budgetrechner: Wie viel Haus kann ich mir leisten?
Speziell für den Immobilienkauf: Der Budgetrechner rechnet aus Einkommen, Eigenkapital und Nebenkosten einen realistischen maximalen Kaufpreis.
Wann sinnvoll: Ganz am Anfang der Immobiliensuche, um die Preisspanne einzugrenzen und nicht in der falschen Kategorie zu suchen.
7. Nebenkostenrechner Hauskauf
Grunderwerbsteuer, Notar, Grundbuch, Makler — die Kaufnebenkosten liegen je nach Bundesland zwischen 9 % und 15 % des Kaufpreises. Der Nebenkostenrechner zeigt alle Posten für dein Bundesland.
Wann sinnvoll: Bevor du dein Budget festlegst. Viele unterschätzen die Nebenkosten und stehen dann mit zu wenig Eigenkapital da.
8. Eigenkapital-Rechner
Wie viel Eigenkapital brauche ich wirklich? Der Eigenkapital-Rechner zeigt, wie sich verschiedene Eigenkapitalquoten auf Zinssatz, Monatsrate und Gesamtkosten auswirken.
Wann sinnvoll: Um zu entscheiden, ob du noch sparen solltest oder ob dein vorhandenes Eigenkapital bereits ausreicht.
9. Umschuldungsrechner
Einen laufenden Kredit zu besseren Konditionen ablösen — klingt gut, aber lohnt es sich wirklich? Der Umschuldungsrechner vergleicht alten und neuen Kredit inklusive eventueller Vorfälligkeitsentschädigung.
Wann sinnvoll: Wenn die Zinsen seit Vertragsabschluss gesunken sind oder du mehrere teure Kleinkredite zusammenfassen willst.
10. Vorfälligkeitsentschädigung berechnen
Wer einen Kredit vorzeitig ablösen will, muss oft eine Entschädigung an die Bank zahlen. Der Vorfälligkeitsrechner schätzt, wie hoch diese ausfällt.
Wann sinnvoll: Vor einer Umschuldung oder wenn du durch eine Erbschaft oder einen Bonus den Kredit auf einen Schlag tilgen könntest.
Bonus: Die etwas anderen Rechner
Neben den Klassikern gibt es auf WievielKredit.de ein paar ungewöhnlichere Tools:
- Mieten oder Kaufen? — Vergleichsrechner, der beide Szenarien über einen frei wählbaren Zeitraum gegenüberstellt.
- Überschuldungsrechner — Prüft per Monte-Carlo-Simulation, ob deine geplante Finanzierung in einen kritischen Bereich rutscht.
- Schuldenfrei-Countdown — Zeigt dir das genaue Datum, an dem du schuldenfrei bist.
- Zins-Zeitmaschine — Was hätte dein Kredit in den 80ern oder 2010 gekostet? Historische Zinsdaten ab 1965.
Fazit
Einen Kredit aufzunehmen ist eine der größten finanziellen Entscheidungen im Leben. Trotzdem verlassen sich viele auf das erstbeste Angebot ihrer Hausbank. Wer vorher 10 Minuten mit einem Rechner verbringt, verhandelt besser, vergleicht fundierter und vermeidet teure Fehler.
Alle Rechner auf WievielKredit.de sind kostenlos, ohne Anmeldung nutzbar und speichern keine persönlichen Daten.
August
23
Artikelserie zum Thema Malediven Urlaub
Januar
21
Wie entwickle ich einen Charakter für eine Kurzgeschichte
Januar
14
Winter / Ice Fails von Januar 2018
Januar
7
Handicaps beim Schreiben
Dezember
24
Eine neue Schreibaufgabe!
Dezember
21
Namen Namen Namen
Dezember
20
Schreibaufgabe nun als Video
Hier das erste Video von http://www.schreibaufgabe.de
Es geht darum, einen Anfang für eine Kurzgeschichte oder ein Buch zu Schreiben.
Oktober
17
GoPiGo it’s alive!
Months ago I backed the kickstarter project GoPiGo and last week the package finally arrived. On www.dexterindustries.com there is a 10 minute video showing the assembly of the little robot.
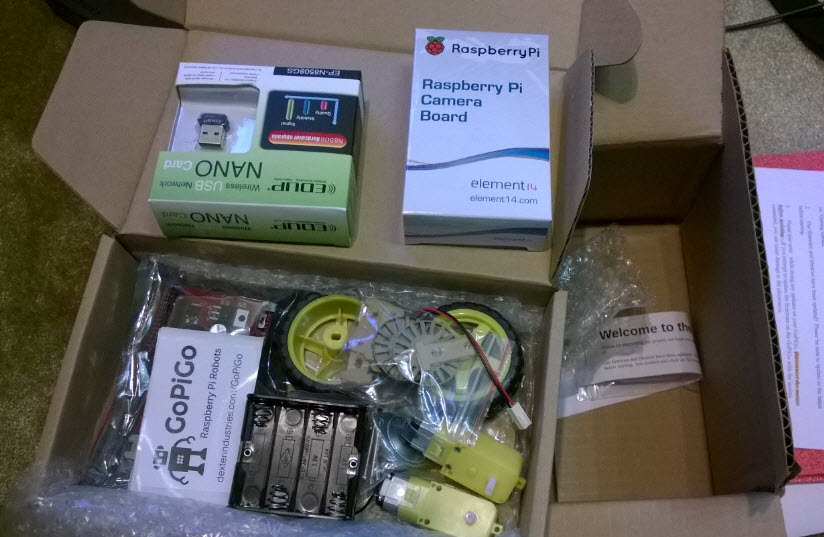
While assembling I got some good and some bad surprises. Anyway at the end everything worked so far and he robot is up and running!
Let’s start with the good surprises. Originally the pack should contain a Raspberry Pi this is still the case but I was surprised I even got the newest model Raspberry Pi B+ in the box.
Unfortunately the video matched not 100% anymore however good enough to build it up with some try and error. So this is what I struggled with:
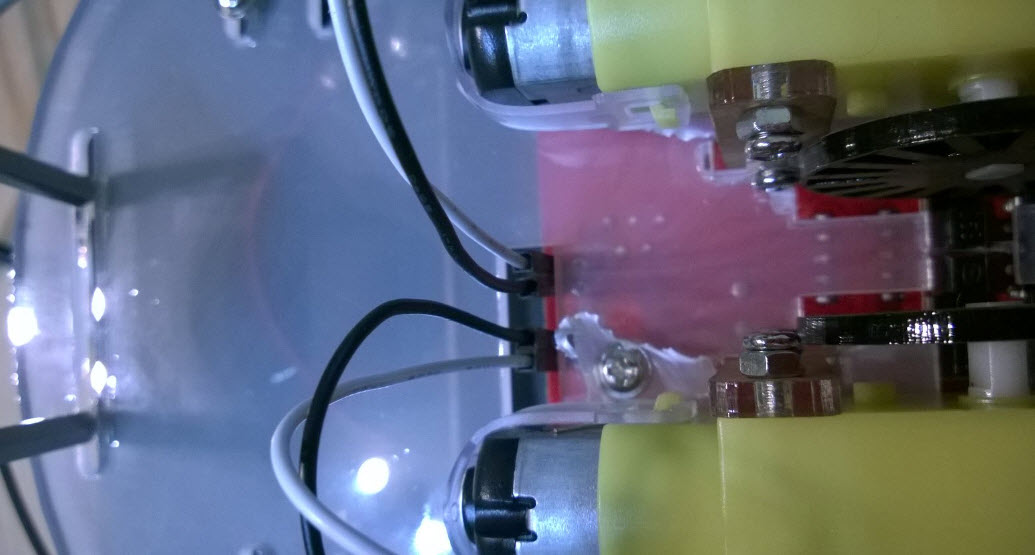
You start with attaching the parts that should hold the motor. If you put in the first motor and later try to add the screw for the second motor – it’s hard to impossible to do so. At the end I first added all screws and put in the motors last. A bit fiddly but its working without destroying have of the plastic.
Speaking of motors the cables have different colors then in the video. From left to right its, white, black, black, white – so white on the outside. If you connect them differently they you might get a surprise when driving the first time.
.
The battery pack looks like a bit higher in the video. So you unscrew the top bar, put in the box and put the screws in again. Well if power is empty you need to do it all over again. My batteries are still charging, so I used this one here:
Nokia DC-16CY tragbares USB-Ladegerät blau
I am sure it works with other power banks too but that one is very light. I have no idea how long the power runs but I am working with it now at least 1,5 hours already.
The next troubles I had was with the wireless configuration. Cable worked fine and the wireless dongle was recognized immediately however it did not get an IP adress. After a while of reading on general Raspberry Pi pages I finally figured it out and changed the config a bit differently to what was suggested in the etc/network/interfaces
Where it says „iface wlan0 inet manual“ I wrote „iface wlan0 inete dhcp“ – easy but without Linux knowledge not so easy anymore. Also I added an „auto wlan0“ before the „allow-hotplug wlan0“. That made it work.
Last one for the VNC connection. Also this one very easy but as a non VNC user, well you know. Do not enter just the IP-Adress of your Pi but also add a :1 at the end for „first server“ otherwise you will get an error message (e.g. 222.111.2.123:1).
As soon as I have added the camera and done something meaningful with the servo – I’ll do another post.